-
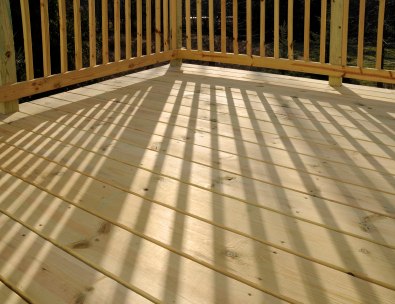
Deck Construction, Cleaning, or Repair
-
Replacement, Repairs, & Renovations
-

- Deck Repair | TDServices | 808.388.3425
*For additional details & review you can also visit yelp.com or my review page
Step 1: Making Repairs
Begin by inspecting the entire deck. Pay special attention to any part of the deck that is in direct contact with the ground, such as the posts, stair stringers or joists that are at ground level. *If you can sink the tip of a screwdriver into a post or joist, it means the you’ve got rot and it’s time for a major renovation. Also, inspect the deck-to-house connection. Screws and bolts can loosen and rust. Without the proper use of spacers and flashing, moisture can cause your band joist to rot. Tighten the fasteners that attach the deck to the house, look for any missing, bent or rusted flashing and carefully inspect inside and out for any telltale black stains that suggest moisture is working its way into your home. Next, look for any cosmetic damage. For example, tap down any popped nails or consider replacing them with screws.
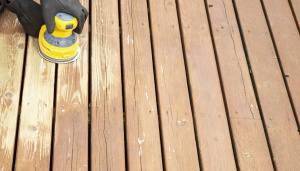
Step 2: Cleaning the Surface
Every deck should have an annual cleaning. Assuming they have been maintained regularly, most decks can be revived with just a deck cleaner. Some products, like Thompson’s Deck Wash ($10, 1 gal. covers 250 sq. ft.), you mix in a bucket and apply to the deck; others, like GE’s Weathermate ($30, 1 gal. covers 500 sq. ft.), come in containers with integral applicators that you hook up to a garden hose. Once on the deck, most still require a stiff-bristle brush and a lot of elbow grease to work the mixture into the wood. For tackling tough stains, use a pressure washer. Go over the deck with a stiff-bristle brush, and then rinse. Allow the deck to dry thoroughly before staining.
Step 3: Applying the Stain
Once all of the repairs have been made and the deck is clean, it’s time to apply a protective finish. Clear finishes and transparent stains are fine for new wood, but for older decks, I recommends using a semitransparent stain. The grain still shows through, but the pigment gives the old wood a clean, uniform color and helps the new wood blend in. I use a pump sprayer and 2-in. brush to apply the stain and only do the underside at the homeowners request. I apply the stain parallel to the deck boards. To avoid staining the nearby concrete, I use a small piece of cardboard as a spray shield; the brush provides even more control around deck railings and posts.
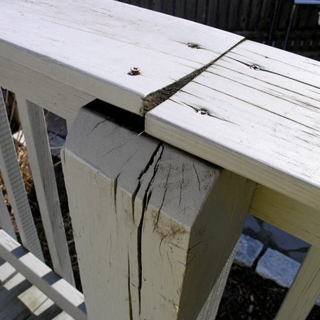
Step 4: Redoing a Railing
If original railing on the deck is in such bad shape, know your options: 1) replace it with a maintenance-free railing system like, Fiberon, a vinyl-coated wood-plastic composite that costs about $70 per 6-ft. section. It’s available in premade panels or as kits. 2) replace it with a matching treated wood.
FYI: For an existing deck or concrete slab, Fiberon makes a surface-mount bracket. For new decks, manufacturers recommend installing the posts before the decking and using metal brackets that attach to the joists. To conceal any minor gaps where the balusters meet the bottom rail, I strongly recommends using a mildew-resistant acrylic caulk.
Choosing the Right Cleaner
There are dozens of deck-cleaning products on the market. Most contain one of the following four chemicals as their main ingredient. Each is effective for different types of stains.
Sodium hypochlorite: This chemical—chlorine bleach—is good for removing mildew but isn’t effective on dirt or other stains. So mix it with an ammonia-free detergent. Thoroughly rinse the deck after using this chemical because it can eat away at the wood, resulting in fuzzing and premature graying.
Sodium percarbonate: When mixed with water, this chemical forms hydrogen peroxide (an oxygen-based bleach) and sodium carbonate, which acts as a detergent. It is good for removing dirt, mildew and weathered wood.
Oxalic acid: This is effective in removing iron stains and the brown-black tannins that frequently occur with cedar and redwood decks. This acid is commonly found in deck brighteners. Oxalic acid isn’t effective against mildew, so you may want to use it after cleaning the deck with a bleach-based cleaner.
Sodium hydroxide: Also known as lye, this is the key ingredient in most finish lifters or removers. Don’t leave it on too long, or it can eat away at the wood.
Be very careful when working with any of these chemicals, especially when they’re in their most concentrated (premixed) form. Wear the proper safety equipment and follow the manufacturer’s directions to the letter. Rinse the surface thoroughly and allow it to dry before refinishing.
D-I-Y CLEANER
Here’s a deck cleaner you can make yourself. Recommended by the U.S. Department of Agriculture Forest Products Laboratory, it’s good for mildew and dirt.
•1 qt. sodium hypochlorite solution (household bleach) •1/3 cup powdered laundry detergent •3 qts. warm water
In a 5-gal. plastic bucket, add the bleach and detergent to the water, then brush the cleaner onto the deck. Rinse thoroughly before applying a finish.
Caution: Do not use a detergent that contains ammonia. Ammonia and bleach react to form a poisonous gas.
*Click here for general fees & additional services
*Call For Estimates | 808.388.3425 |trevor.drinen@gmail.com
*Services include: pressure washing, painting, light carpentry, light electrical, landscaping, minor roofing, & masonry
*Additional services: IT, Web Design, Networking, Email, Domain Setup, Mac / PC / Mobile Devices